

I love giving Christmas gifts. It’s always been hard for me to cut back on gift-making and buying. Where I am OK cutting back is on buying wrapping paper. That stuff can get pricy. If you happen to have an overflowing shelf of paper grocery bags like we do, you are halfway to homemade, stamped paper bag holiday wrap for a fraction of the cost! Carving your own stamps is a project for “big kids” ages 13+ (adult supervision still recommended), but stamping the patterns can be done by anyone in your household.
Things You’ll Need
- Paper bags
- Stamp carving rubber
- Carving tool with cutter tip and gouge tip (this kit contains the rubber and cutting tools pictured in this post)
- Scissors
- Pencil or pen
- Pencils with unused, attached erasers
- Ink pads
- Scrap paper
- Iron (optional)
- Gift tags or tissue paper for stamping and wrapping

To get started carving stamps, I like to practice on a pencil eraser. Pencil eraser rubber is really easy (and cheap) to cut with carving tools or cutting blades. Draw a simple shape, like a star, and practice cutting out the shape with your tools. The number one most important rule in stamp carving is to keep the blade moving away from your body parts, so hold the pencil carefully, and work slowly and thoughtfully.

Test your eraser stamp out on the scratch paper. When you have a shape you like, use the scissors to cut a small piece of carving rubber. Grab your pencil and think about an easy shape that would look cute in a repeating pattern on your wrapping paper.

While you are thinking about what shapes you would like to try carving, remove the handles and base from your paper grocery bags, and cut them into large pieces of paper. Iron the paper flat.

A holly leaf is a good beginner shape. Use your pencil to draw a simple leaf shape and the wide gouge tool to remove the rubber around your drawing. Always keep your fingers and fleshy bits out of the path of the blade.

Continue carefully cutting around the entire holly leaf. When you think you’ve removed enough of the background rubber, press your stamp into the pad and make a few test prints.

You can always carve away any extra rubber.

When you are happy with your test prints, begin stamping your holly leaf into a green ink pad and onto your ironed paper. Use an uncarved pencil eraser in red ink to add holly berries.

After you have gotten the hang of the holly leaves, you may be ready for a more complicated design, such as a candy cane.

Draw a candy cane onto a second piece of carving rubber. Use the pencil to designate the areas of the cane that you want to carve away so that you don’t get confused as you work.

Use the gouge tool to remove large areas of rubber and the fine-tipped cutting tool to remove the striped areas within the cane. Always, always work the blade away from your body. Always.

When you think you have removed enough carving rubber, make a test stamp on your scratch paper.

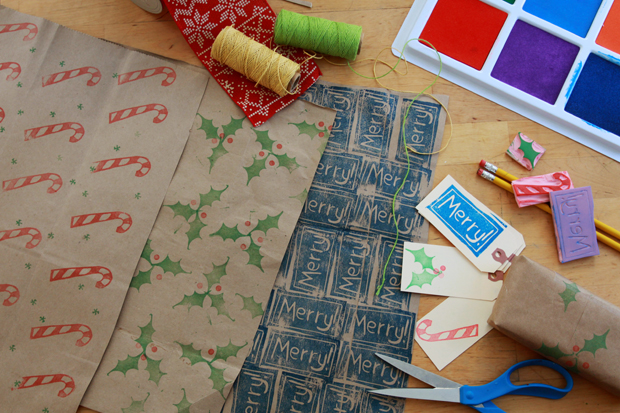
Interested in carving out a word? Look at the image below and see if you can spot a problem with the written word “Merry!”

When carving words into stamps, you need to remember that a printed stamp creates a mirrored image of what you write. So if you carve the word “Merry!” just as you would write it in a letter to grandma, you will end up with a print that is readable only in a mirror. Ask me how I know…

The upside to making this error, is that a) you will probably do it only one time and b) you can use your incorrect print as a guide when you rewrite the mirrored word onto the carving rubber.

Use the fine-tipped cutting tool to carve the mirrored word. Then test your new, perfect stamp before using it on your wrapping paper.

Carving away just the letters creates a nice block of negative space when you stamp, so I added a small rectangular border to make “Merry!” look a bit more finished.

Begin stamping your patterns onto craft paper, gift tags or your grocery bag paper.

Experiment with colors and repeating patterns.

Use your homemade gift wrap on your holiday packages this year for a personal touch.

And if you are mailing gifts to loved ones, these stamps work well to add holiday cheer to your otherwise plain brown wrap.

Clean your stamps after each use by washing them in cool water and gentle soap or with alcohol-free baby wipes, and they will be an asset year after year.

(eHow)